Sunday, February 28, 2010

Mermaid Tissue Box Cover

 
Here is another Kaiser wood square tissue box cover. I "cheated" with this one...I used a digi kit from Olivia & Co, called Mysterious Deep, to make the DP for this project and the Mermaid image is from Wink Wink Ink Digital Design. I was going to colour her but in the end decided to use the coloured version and highlight with Kindy Glitz and dimensional glaze. I have so many projects on the go that I decided to take the quick option for this one...didn't feel quite right not colouring though lol! 

The box was painted with Copper metallic craft paint then the DP was adhered. I cut the panel for the image and matted it with brown CS. The panel was then mounted with dimensional dots. The shells were added to the top with a hot glue gun.

 
This was a really quick, easy project. I'm loving doing these tissue box covers. Likely everyone I know will be getting these for pressies this year !!! :)

Saturday, February 27, 2010

Michelle Perkett Studio Challenge #18

 
This is my entry in challenge #18 at Michelle Perkett Studio. This week we are to make a Side Step Card...with a spring theme. There is a link on the challenge blog for making the basic card.  I was really looking forward to participating in this challenge as I enjoy making different fold cards...they are so much fun to decorate :) There are some fabulous cards this week...and the DT outdid themselves :) It's worth a trip over to the blog to check them out!

I had a few ideas running around in my head and started with another image...I wanted to try an experiment...it was a disaster! I guess some experiments go that way lol! So I went with plan B!! And yes, it's purple and green...I've been very good, using other colours lately, but I was having withdrawals LOL!! Besides, these are perfect spring colours!

I used Michelle's very cute Mary, Mary image. Printed her on Splendorgel 190 and coloured with Copics. Her hair, flowers and shoes have been highlighted with glitter pens and the watering can has been coated with a glaze pen. The base card and mounts are SU Old Olive and Perfect Plum...2 of my favourite SU colours :) The DP is very nearly my favourite...Kaiser Lilac Avenue from the 6" paper pad. The tree was cut with my KNK Maxx and paper pieced...with the edges chalked. The flower and bird border is cut from a 3D border strip. I separated one of the birds to place in the tree. Rhinestones have been used to highlight some of the flower centres. The caption is Michelle's and comes with Mary. Both the tree and Mary have been mounted with dimensional dots.
 

This was lots of fun to make but I'm sure it took me longer to make than most of my 3D items! I seem to fuss more over cards than I do with the other things I make???? I wanted to make this larger than the tutorial instructions...that was fun...NOT...math is not my forte!! But I did manage in the end...it is a 5x7 card.

Tuesday, February 23, 2010

Princess Lotus Flower Tissue Box Cover

 
This is my 2nd entry in the Just Add Ink Challenge #5...a new Australian blog. The challenge is to add DIMENSION...so here goes!  Hopefully lots of rhinestones and lots of layers qualify as dimension!!!

This is what I made today :) I'm trying out different items to decorate as I am going to try selling some of my 'things' and want as much variety as possible, to test the waters, so to speak!  Today's adventure was to make a tissue box cover...another Kaiser wood product. This one is for the large, square tissue boxes.  I thought it would be quick and easy to decorate...ha!! I think I make things hard for myself sometimes...it wasn't so quick by the time I dithered over the details!!!!

I had a plan when I thought up this idea...I wanted the Bless You somewhere on the project as a bit of a play on the theme...you know "Bless you" when someone sneezes...tissues...you get the picture lol!

The image is from Michelle Perkett and is called Princess Lotus Flower. She is beautiful and reminds me of a yoga princess...and she looks to me like she's giving a blessing...another "bless you" lol!!  I printed her onto Neenah Classic Crest and coloured with Copics. Glitter pens have been used to highlight her hair, the flowers and the bands on her arm and dress. I used Kaiser rhinestones for the gems on her bands and the flower centres...also on the scallops on the top of the box. The box has been painted in black craft paint and then decorated with Kaiser DP from the Empire Collection. The CS is SU Elegant Eggplant and Pumpkin Pie.  The scallop and circle for the top were cut with my KNK Maxx.

  
This shows the DP and the top of the box.  
This was a very different project for me and I'm not quite sure what I think of it yet! I am going to try a couple more in different themes before I make up my mind whether I like it or not.  My theory is that there has to be something better to look at than the cardboard tissue boxes...and these could be made to match in with any decor :)

Sunday, February 21, 2010

Mary, Mary Frame

 
Woo hoo...again :)  This is my second post today...making up for lost time! I've had a lovely day, apart from fighting with the computer this morning (I can't see why they don't just do what you want them to!!)... colouring and playing. I have 3 projects on the go and this is the first one finished.

I am entering this in the Just Add Ink Challenge #5...a new Australian blog. The challenge this week is to add DIMENSION!

This is a Kaiser wood frame approx 25cm square.  I painted it with brown oxide craft paint then used DP from Kaiser collection "Blushed". The image is Mary, Mary from Michelle Perkett Studio. I have sooo many of Michelle's digi stamps...they are my very favourite digis...just LOVE them! Unfortunately, Michelle is creating new stamps faster than I can colour them lol! So I have some catching up to do :)

Mary, Mary is printed on Neenah Classic Crest paper and coloured with Copics. I used glitter pens (my new best friends!) to highlight the flowers and shoes.  The watering can has been coated with glaze pen.  The flowers are cut from a 3D Border Sticker. I cut the image out and mounted it on dimensional foam dots.

I had a lot of fun making this and I'm really pleased with the result. AND...it's pink & brown...I'm definitely getting into this using new colours thing :)  This was fairly quick and easy to make, so I'll be buying some more of these frames to decorate.

Here is a close up of Mary :)

Peace Mirror

 
Woo hoo...At last I am back to creating! It's only been 2 weeks but it feels like a month. I've been having serious withdrawals lol!

Here is another Kaiser wood mirror. This one is approx 35cm x 30cm. I love decorating these mirrors but boy are they a pain to photo!!!! Next time I think I'll take the mirror out to photo it. This time I took it outside, thinking the colour would be better, so there is lovely blue sky and whispy cloud reflection :)

I used Peace Fairy from Michelle Perkett Studio. Printed her on Saxton 200 and coloured with Copics. Glitter pens were used to highlight her hair and create the detail on the dress and shoes. I used Diamond Stickles on her wings. The dove was coated with Craft Smart Photo Finish to give it a soft, glazed look. Both the fairy and dove have been cut out and mounted on dimensional dots.

The mirror frame was painted with Brown Oxide craft paint.  The DP is Kaiser from the Prairie Lane Collection. I used 2 different papers and joined them with DS tape. I added chocolate Kaiser pearls to the centres of the brown flowers (?)

The words are the caption from Michelle's stamp and read... "Think beautiful thoughts of peace and share them with the world"...beautiful!  I cut the words in vinyl with my KNK Maxx and went over them with a silver glitter pen.  They are very subtle and show up best when the light is on them. I didn't want them to stand out too much so I am happy with the result...just hard to see in the photo :)

These are very different colours for me to be using but I like them. I'm slowly getting out of my "green & purple" box LOL!!  Well, I'm off to do some more playing :)

Tuesday, February 16, 2010

Michelle Perkett Challenge #17

Here is my DT contribution to the Michelle Perkett Studio challenge #17. The challenge this week is to use pale pink, fuchsia, orange and green. I decided to make another mirror...a larger one this time...even though they are a pain to photograph!! And this one seems to be a bit blurry for some reason...sorry about that!! I just didn't have time to do another one.

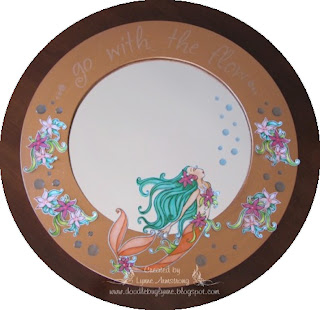
The 41cm mirror is a Kaiser wood product, painted with copper metallic craft paint. The image is Just Breathe digital stamp from Michelle Perkett Studio, printed on Saxton 200 and coloured with Copics. The flowers are taken from the image, coloured, cut out individually and then grouped together on the frame, with some raised on dimensional dots. I went over the mermaid's tail with clear glitter pen to highlight...and used glitter pen to highlight her hair. I used glitter glue on the fuchsia flowers and diamnod glitter on the pale pink flowers. The bubbles on the glass and frame are Kaiser pale blue droplets. I cut the caption from vinyl with my KNK Maxx.

I love this image of Michelle's...well actually I love ALL of Michelle's images!...I can't help but relax when I look at her :) Her name is Serenity...I think it suits her very well!

Saturday, February 6, 2010

Michelle Perkett Love Letter Blog-hop


Hello everyone...if you've been hopping in order from the start of the hop at Michelle's blog HERE then you will have hopped to here from the lovely Crystal's blog.....and from here will be hopping on to amazing Marilyn's blog....

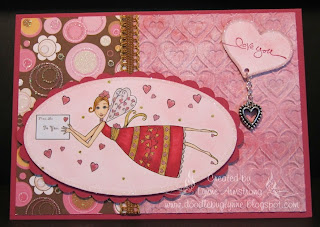
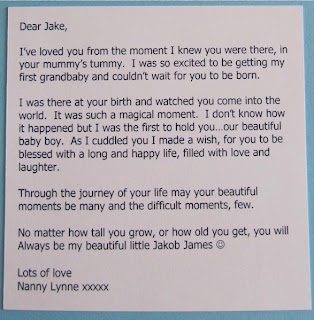
Here is my card using the Love Letter Fairy by Michelle Perkett. Our instructions were to use lots of pink, red, gold...and bling...of course :) And then there was the love letter to consider! It took me a while to decide whether I'd participate or not because I don't think I've ever written a love letter in my whole life!!!! I decided to write it to my beautiful grandson Jake...my first grandchild (who is now 10 yrs old)...I have 5 now! I love them all dearly but there is definitely a very strong bond between Jake and I. He's a bit of a Nanny's boy :) See below for the project I made for Jake :)

The base card and scalloped oval is SU Purely Pomegranate. The Love Letter Fairy is printed on Splendorgel 190 and coloured with Copics and glitter pens. I sponged the background of the image with SU Regal Rose ink before colouring. The embossed DP is from BG Sugar Rush 6" paper pad, embossed with a Cuttlebug folder, and the other DP is from a 12" glitter paper pad in my stash. I hand cut the heart, sponged with Regal Rose and stamped 'love you' in Purely Pomegranate. The edge of the oval mount, edge of the heart and the fairy's wings have been glittered. The oval and scallop oval were cut with my KNK Maxx.

I really enjoyed making this. Michelle's images are beautiful to colour. LOVE them!

Now hop on over to amazing Marilyn's blog to see her wonderful creation. Don't forget to leave a little love for all the amazing creations along the way :)

Jake's Love Letter Bookplate


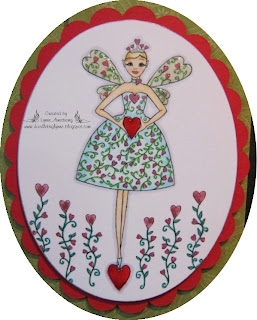
When I decided to be part of the hop I didn't realise the colours were pink & red. I had in mind what I would do as a project, and with Jake being a boy I didn't want to use those colours! So I made a card for the hop in the required colours and then made another project for Jake :)

So.....this is the bookplate I made for the inside cover of his baby album, that I scrapbooked for him. I wanted to use the colours I'd used on his front page...baby blue & navy...the pinks & reds would have looked a tad out of place!!! And I didn't want as much bling on this project. There is a little but not much! I used a glaze pen on the wings instead of glitter and used glitter pens for the hearts.

Thursday, February 4, 2010

Michelle Perkett Challenge #15


This is my entry in the Michelle Perkett Challenge # 15 The challenge this week is to make a treat box and matching tag. I love little boxes/bags/containers so I was keen to get into this one :) The DT projects are absolutely gorgeous! Great job girls :)

After a bit of dithering about what sort of box to make, I decided on this Gable Box. I found the tutorial HERE on SCS. I hadn't made this one before so did a test run on some scrap CS first. I decided to make the box bigger to more easily fit one of Michelle's images on the front. I had already decided to use her Love Fairy image as well as the Love freebie she provided for her PCP group, for the tag. I really enjoyed making this. The box was quick and easy to make so I'll definitely be making more!

The box is made from SU Old Olive DP. I printed the image onto Saxton 200 and coloured with Copics. I think my new best friends are glitter pens lol!...I used a few on this project. I love them because they are fine enough to go over the lovely detail work in Michelle's images :) All the small hearts are glitter pen and the large hearts have been coloured with Copics. Normally I would glitter the fairy wings...because, as you know, all fairies have glittery wings!!!!...but this time I decided to use dimensional glaze instead. The large hearts on both images are also glazed. The oval mounts and scallops were cut with my KNK Maxx. The scallop mounts are SU Real Red. The box is finished with a Kaiser red grosgrain ribbon.

I think it took me longer to tie the darn bow than to make the whole box!!!! Arrrgh!! I'm still not happy with it but gave up in the end! It's obviously an art I need to practice...even after going and watching a YouTube demo on how to do it!!!

Tuesday, February 2, 2010

Lee's 50th Card

I made this card for my SIL's 50th birthday. She has a warped sense of humour...like me!... so I needed something funny for her. I found this image at Bug-a-boo Digis in the Stella section. I know this is going to give Lee a good laugh when she gets it :)

The base card and circle mount are SU Purely Pomegranate. The design elements are mounted onto textured black CS. I printed the image on Saxton 200 and coloured with Copics. I've highlighted with glitter pens and glittered the cake frosting. The 50 has been cut from CS and JAC paper and glittered. All the design elements have been mounted on dimensional dots.

This was a fairly quick card to make and something very different from my recent creations!! :)

LinkWithin

Related Posts with Thumbnails