Monday, June 20, 2011

Sonny's Party

Hello everyone...this is my submission for the Pollycraft DT call, which is open until 27th June.  Paula has posted 2 freebies HERE and asked that we use one of them on our project. They are both gorgeous but after some deliberation I chose Sonny's Party for my card...mainly because I had the perfect DP to go with her :) I really love the cute little Blue's Branch birdie too and have a project half done for him, which I'm hoping to get into the challenge before it closes...another "in by the skin of my teeth" effort, if I make it in time lol  I really must stop doing that!!

Here's my card:

The background paper is from a 12 x 12 Franchville specialty DP.  I had to butcher it and layer it to get it how I wanted lol but I think it worked okay. This is the BLINGIEST background I've ever seen!!!! And definitely way more bling than I've ever used but IRL it looks really pretty....and suits Miss Sonny to a tee :)  If you click on the photo to enlarge you'll see the bling in all its glory... To add a bit of dimension, I've printed and coloured a second balloon & hair flower and popped them up on dots. The balloon has been glazed then the dots Stickled (is that a word lol??) Her hair flower has a little gem in the centre.

A close up:
Copic colours:
Unfortunately I forgot to include the greens for her eye colour :( Put them away before taking the photo...they are G17, YG05 & YG11... I think??!!

The section of balloons I layered underneath the main panel didn't have any bling on them and looked a bit out of place, so I used LOTS of Stickles and blinged them up to match the others.

Please wish me LOTS of luck.....I would soooo LOVE to be on Paula's team.

Thanks for looking...have a wonderful day :)

Supplies:
CS:  X-Press It blending card, SU Perfect Plum
DP:  Franchville
Stamp:  Sonny's Party from Pollycraft
Colouring:  Copics, glitter pens
Other:  SU Crystal Effects, Stickles, Foam dots

Friday, June 17, 2011

Shopping Hanger

Happy Friday everyone. It's time for another challenge at The Outlawz Copic/Promarker group. Wasn't the summer party a blast!! Lots of gorgeous entries to drool over :) This week's theme is Pleats & Folds   

This month we are offering a prize of 10 Pollycraft digis...to go into the draw for this prize you must enter a project into each challenge for the month. There is no cut-off for the challenges until the last one, so you can enter the challenges anytime during the month, up to 30th June!!!  The winner will be randomly drawn on 1st July...so what are you waiting for...get those entries in!!

Okie dokie...now onto my project for this week...Pleats & Folds....I've made another little hanger. You're probably going to be over looking at hangers by the time I've made a few more lol  When I have a fad for something, I do it well!!


I've used Juliet Shopping from Enchanted Cards...Girls About Town set. I'm ashamed to say I've had this set for a loooong time and not used any of it. I've had great plans a couple of times but not done anything with them.  It's a very versatile set that I'm definitely going to make a few more things from. More hangers, for a start!! lol The quote comes with the set and I thought it went sooo well with this image :)

The base board for this has been cut from thin craftwood by my lovely hubby. He's cut & drilled me a little stack of them so I really do have to use them now :) 

A close up of Juliet:

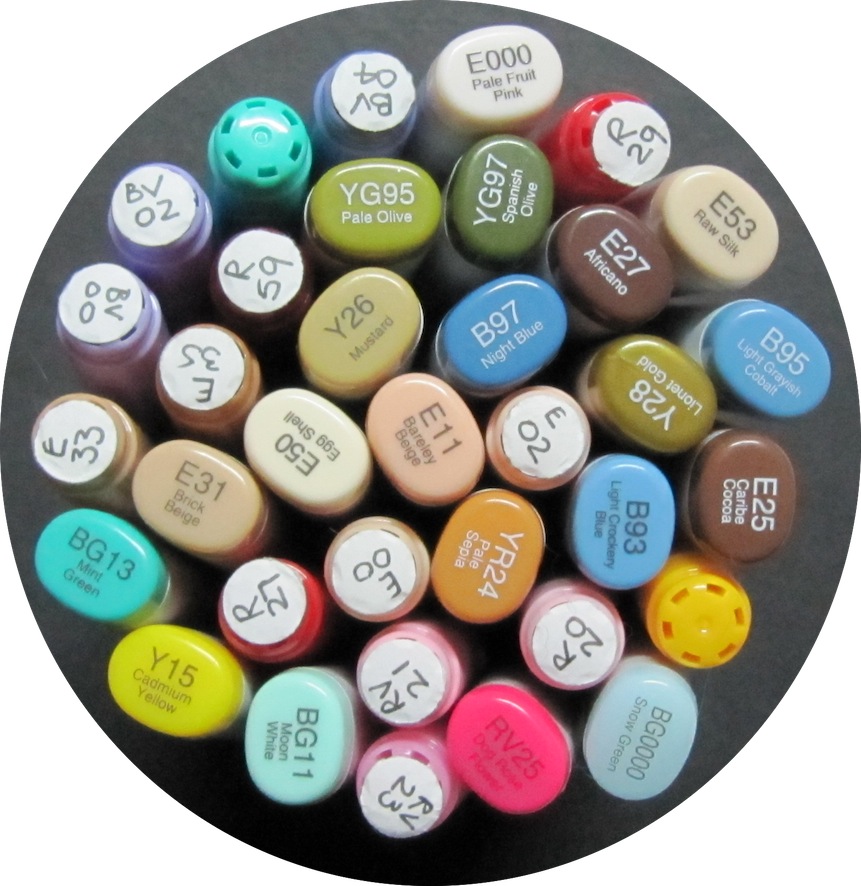
And I remembered to photo the Copics again :)

Her jacket colour is a bit deceptive in the photo...looks a bit like purple but it's coloured with the E70s, as have her boots & handbag.  And before you go thinking I'm super clever colouring little pink flowers all over the shopping bag...it has been paper pieced :)

Thanks for looking and I hope you'll come over to The Outlawz and play along with us in our challenges.  Have a wonderful day :)

Supplies:
CS:  X-Press It blending card
DP:  Digi paper
Stamp:  Juliet Shopping from Enchanted Cards
Clouring:  Copics
Other:  Craftwood base, bag charm from stash, foam dots, craft wire from stash

Monday, June 13, 2011

Chester in Love

Hello everyone...sheesh...I managed to get this posted with 5 mins to spare for the Pollycraft challenge of Love & Marriage!!!  Far too close for comfort for my liking!! Hello Helen *waving* I think you've taught me some bad habits...bwaahaaahaahaahaa!!!!!!!  I don't think I'll repeat the experience, it's definitely not good for the blood pressure :) I loaded the photo so I could link him up and I'm now back to do the post!!


I've used the sketch from this week's Inkspirations challenge for cute little Chester, who is of course from Pollycraft.  I've been wanting to get back into playing in the Inkspirations challenges but haven't seemed to find the time lately :(  My lovely friend Helen is one of the very talented members of the DT and creates some very clever, totally gorgeous projects.  I happened to be the oh-so-lucky recipient of her DT creation this week, which you can see HERE.  It's even more stunning IRL!!! Thanks so much Helen...MWAH

Righto...onto some deets about the card...The background has been made with DP using the inlaid embossing technique. Another lovely friend, Wendy, has made a ton of cards using this technique and I really loved the look of it so just had to order the SU embossing folder to have a play. This is my first try and I'm really happy with it :) I think it will be great for using up scraps. I'm such a hoarder and have lots of little bits I can use :)

A close up of little Chester:

I was in such a hurry to get Chester coloured up and posted that I totally forgot to outline his little heart in gold glitter pen and then glaze it with Crystal Effects :(  I'll go do that after I finish here!  And no photo of the Copic colours this time...sorry!

Thanks for looking....have a wonderful day :)

Supplies:
CS:  X-Press It blending card,  SU Purely Pomegranate
DP:  Made With Love from Kaiser
Stamp:  Chester in Love from Pollycraft, SU Short & Sweet
Colouring:  Copics
Other:  SU Purely Pomegranate ink pad, SU embossing folder, foam dots, SU Crystal Effects 

Friday, June 10, 2011

Emma Surfer

Hey everyone, we're having a SUMMER PARTY over at The Outlawz this week. Hope you'll come and join us...there are some FABULOUS prizes to be won. Our Copic/Promarker challenge for party week is to Create a Background with a summer theme.

Here's my card :

I've used the very cute Emma Surfer from CC Designs. Her background has been created using the Boathouse digi, also from CC Designs, and then creating the sun, sky & sand with my Copics.  I didn't find this the easiest challenge lol  I like to do my skies with sponged ink, so this was out of my comfort zone! The sun was easy...just made a circle and coloured it. I've never coloured sand before so it was probably the biggest challenge of the lot!! I can't say I'm overly thrilled with any of it really!

And a close up of cute Emma : 

Colours used:

Hope to see you at our challenge this week...and good luck for winning one of those fabulous prizes.
Thanks for looking...have a wonderful day :)

Supplies:
CS:  X-Press It blending card, SU Not Quite Navy
DP:  Seaside from Kaiser 6" paper pad
Stamps:  Emma Surfer & Boathouse from CC Designs
Colouring:  Copics, glitter pens
Other:  Shimmer mist, SU Crystal Effects, foam dots
 

Friday, June 3, 2011

Emma Bug in Pink & Green :)

Hello everyone...it's time for another challenge at our Copic/Promarker group over at The Outlawz.  Our challenge this week is an easy one...Colour using pink & green.  Who doesn't love that colour combo?!
This week I've made a birthday card for a sweet little girl...Tameka...who turned one on Wednesday.


This is Emma Bug from CC Designs...isn't she the sweetest thing :) I've used one of my favourite DPs from Kaiser...Hey Birdie. The background is one of the specialty papers from the 6" paper pad. It's all sparkly & gorgeous. The frame and mats are another Penny Duncan Shaplies file, cut with my KNK Maxx.


I am impressed...I actually got the bling to photo okay this time...yay  If you click on the photo to enlarge it, you'll be able to see the bling in all of its magnificence lol  I used a small paintbrush and painted over her little suit & socks with some shimmer mist. I really like this effect...more than spraying it on I think...it gives a lovely, all over pearlised finish.

And I'm going to try and be good and photo the Copics I use from now on...just have to remember not to put them away as I go...might take a bit of practice!!  The one without the number is YG67. Didn't realise the dot had come off the top :(

Thanks for looking...have a wonderful day :)

Supplies:
CS:  X-Press It blending card, SU Purely Pomegranate
DP:  Hey Birdie from Kaiser
Stamp:  Emma Bug from CC Designs
Colouring:  Copics
Other:  PDC Shaplies, KNK Maxx, computer generated wording, Diamond Stickles, shimmer mist, foam dots

Monday, May 30, 2011

Wedding Book Card

Hello everyone...sadly today is the last project for my Pollycraft GD spot :(  The theme this week is Be My Teddy Bear.  I've LOVED working with all the lovely, talented girls on Paula's team. Thank you so much Paula for having me as one of your Guest Designers...BIG hugs xx

My project this week is a book card. I found this idea on Tracy's blog and loved it. Tracy has a fab tutorial HERE for making these, which is very easy to follow. They are much easier to make than they look :)  Thanks Tracy...*waving*


Front:

One of my nephews is getting married in July so I've made this as a little wedding keepsake box. The tag in the inside pocket is for a little wedding photo, so it's been left blank. The cute couple are Cuthbert & Kiki Wedding from Pollycraft...aren't they sweet! The gorgeous frame & mat they are sitting on is a cut file from Paperthreads, cut with my trusty KNK Maxx.

Here's a photo of the 'card' open:


And one of the 'book' part:


Pop on over to the Pollycraft challenge blog and check out all the gorgeous DT inspiration...and come and join us in the challenge, we'd love to see what you create.

Thanks for looking....have a wonderful day :)

Supplies:
CS:  Regal Craft shimmer card, watercolour paper, SU Shimmer White, CM Gold
Stamp:  Cuthbert & Kiki Wedding from Pollycraft
Colouring:  Copics, glitter pens
Other:  CB embossing folder, KNK Maxx for cutting Paperthreads frame & mat and gold vinyl wording on inside pocket, Kaiser paper flowers, organza ribbon from stash, MS border punch for pocket border, foam dots

Friday, May 27, 2011

Stamper Loralei

Another week has flown by...don't know where the time's going these days...I'm sure it was only Friday a couple of days ago!! Being Friday, it means a new challenge at our Outlawz Copic/Promarker group. The challenge is a very easy one...Anything Goes...so get out those markers and show us your projects! :)

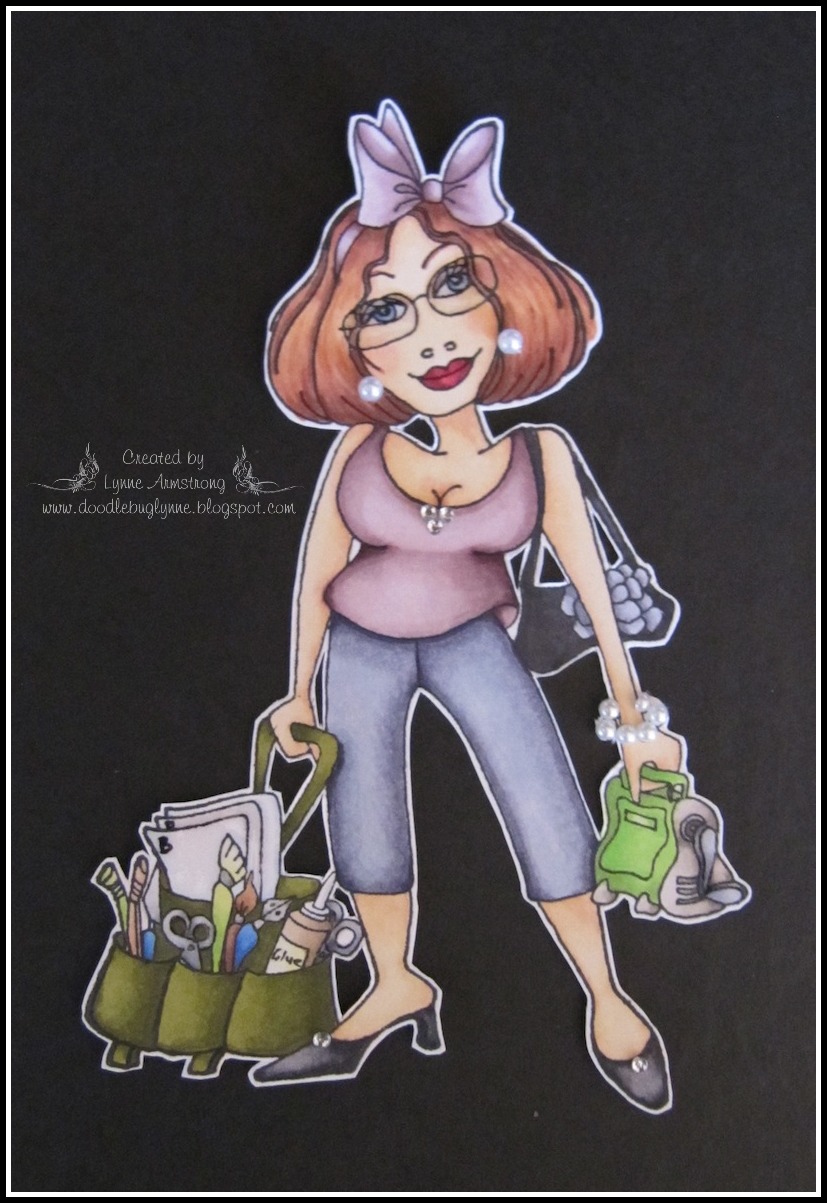
For my project this week I made a little wall hanging with the gorgeous Crafty Girl stamp by Loralei Designs...yes, I actually STAMPED this image lol  I'm pretty hopeless with "real" stamps, I think that's why I stick to my digis :)  Here's a photo of the finished project:


Isn't she gorgeous!! I've blinged her up a bit...she has a little bling on her top & shoes and a pearl bracelet and earrings. Don't we all head out to craft classes looking like this??!!  I wish I could look like her anytime, let alone going to class looking like her lol  In her craft caddy are her Cuttlebug plates...I've given the top 2 the letter B and left the back one (the A plate I'm assuming!) white. The 2 'B' plates, the handle on the CB and her glasses have been glossed using SU Crystal Effects...LOVE that stuff!!

I found the idea for the hanger and the wording, in a craft magazine I was browsing through while staying with my lovely friend Helen, back in February...so filed it away for future reference :) I'm going to make a few more of these with different subjects...sewing, scrapbooking, reading, etc

Here's a close up of Loralei before I added her to the hanger:


Thanks for looking...have a wonderful day :)

Supplies:
CS:  X-Press It blending card
DP:  Kaiser from the Empire Collection
Stamp:  Crafty Girl from Loralei Designs
Colouring:  Copics
Other:  Chipboard for hanger, jewelry wire from stash, kaiser pearls & rhinestones, SU Crystal Effects, power punch for hanger holes, computer generated wording, foam dots

Monday, May 23, 2011

Tea in the Twenties

Happy Monday everyone...although I guess it's back to work for a lot of you so it's probably not such a happy day lol but I'm happy coz it's time for another Pollycraft challenge :)  This week's theme is an Embellie Bingo challenge. Following the chart below, you must use 3 embellies in a row...either horizontal, vertical or diagonal.  I chose to use the row of : lace, gems, tag after a lot of procrastinating!!  I'm not that good with embellies at the best of times, so this challenge stretched me a bit, which is the whole idea of a good challenge...to get you out of your comfort zone and trying new/different things :)

Here's the bingo card:
And here's my card:


I've used the lovely Cherry Kisses Tea in the 20s from Pollycraft.  I haven't really tried vintage much so thought I'd give it a go. I'm obviously hopeless at the distressing bit as I couldn't bring myself to tear or rough up any of the elements lol  I did manage to give the edges a bit of distressing by sponging with ink so I hope that counts as vintage! All the DP used in this project is from a digi kit by Digi Chick.

I had a go at some tricky bits with this card...I paper pieced the dress with the same design as the shadow mats, printing it onto my Copic paper and cutting out the dress and arms as one piece. I also placed Miss CK onto a panel of the printed design paper and printed it on my Copic paper so I could colour her. A bit of messing around but I'm really happy with the result...this has opened up more options for backgrounds for me :)  I then used my Copics in coordinating colours to highlight and shadow the DP dress.

And a close up:


Originally I made this rosette as the 'flower' element for my card but changed my mind and went with the other embellies instead. FYI it's made with an MS border punch, the DP is cut 1" wide after punching and it's the width of an A4 sheet of paper.  I've scored the fold lines 1/4" apart. Here's a close up:


These are SOOOOO easy to make, and for someone who's not into using many embellies, I really like them :)

If you've stuck with me this far, you deserve a medal lol  This has been a longer post than normal for me.

Thanks for looking...have a wonderful day :)

Supplies:
CS:  X-Press It blending card, SU Basic Black
DP:  Digi kit from Digi Chick
Stamp:  Cherry Kisses Tea in the 20s from Pollycraft, SU Short & Sweet (sentiment)
Colouring:  Copics
Other:  SU Oval & Scallop Oval punches, MS border punch, paper lace from stash, Kaiser rhinestones, SU Antique brad, foam dots

Friday, May 20, 2011

Fairy Sweet Day

Hello everyone...yay, it's Friday and time for a new Copic/Promarker challenge over at The Outlawz. The theme this week is to show us your Colourless blender or Promarker techniques...a nice easy theme so come over and join in the fun, we'd love to see what you do with that colourless blender and those fab Promarkers :)  And don't forget there are some awesome prizes to be won!!

Here's my card:


I've used the very cute Birthday Gretel from CC Designs. I'm such a sucker for "cute" and CC Designs have LOTS of tempting cuteness to choose from...ahem...and I have a considerable collection of them!!

My colourless blender technique is on the balloons. I flooded the balloons with colourless blender before colouring them, starting with the back balloon and working forwards to the front one. This gives a lovely translucent effect when dry. Then I painted lightly over the top with some shimmer spray to give that soft, pearly look.  It's SOOOOO frustrating that I can't get the blingy bits to photo well :( 

I love it when something I have in mind actually turns out the way I envisioned it LOL  I'm really happy with this whole card! I don't do lots of pink things...and this is very pink!...but I still like it, even in all of its 'pinkness' :) 

And a close up of the little lady:


I'm absolutely LOVING these Shaplies from Penny Duncan...*waving* to you Penny...they are SOOOO much more versatile than Nesties!!  I can make them any size I want and alter them to suit my images. I stretched this one sideways to accommodate the wider image...just wonderful!! If you have an electronic cutter, go and check out Penny's site. These files are ALL FREE over there.  The link to Penny's site is in my sidebar :)  I'm sure most of them are also in PDF/JPEG format so if you don't have a cutter, and you do have some patience lol, you can still use them.

Thanks for looking...have a wonderful day :)

Supplies:
CS:  X-Press It blending card, SU Regal Rose
DP:  Background paper is from the Party Time 6" pad by Papercraft, all other DP and the tag is from the Sweetcakes digi collection by Summer Driggs
Stamp: Birthday Gretel from CC Designs
Colouring:  Copics, glitter pens
Other:  PDC Shaplies from Penny Duncan Creations, Shimmer Spritz, SU Crystal Effects, computer generated wording, Cuttlebug, KNK Maxx, foam dots 

Monday, May 16, 2011

Follow Your Dreams

Happy Monday everyone :)  Here's my Pollycraft GD card for this week's challenge, which is Music, set by Paula.


This is Jerry Kisses Drummer Boy from Pollycraft...isn't he cute. I've given him punk hair with a blue streak, just for fun :) I printed the drum kit again, without the two drums at the back, and popped it up over the original image to create some depth. IRL it really looks like he's sitting behind the drums. The sketch I used for the layout is from this week's Inkspirations challenge.

Here's a side view of the raised drums:


It's very hard to see in the photo but I've added SU Crystal Effects to all the "metal" bits on the drums. I just wish it would photo better!!  The blue star has "You're a Star" written in gold glitter pen. The background DP was created from SU So Saffron CS and the SU music stamp wheel with So Saffron ink.

Thanks for looking...have a wonderful day :)

Supplies:
CS:  X-Press It blending card, SU Choc Chip, So Saffron & Brilliant Blue (retired)
Stamp:  Jery Kisses Drummer Boy from Pollycraft, Inkadinkado stamp for sentiment, SU Music Wheel
Colouring:  Copics, glitter pens
Other:  SU Crystal Effects, KNK Maxx to cut stars, foam dots, gold metallic stamp pad, SU So Saffron stamp pad, the 2 little 'brads' are the centres from jeans buttons I had in my stash :)

LinkWithin

Related Posts with Thumbnails